Nail art has become a captivating form of self-expression, with individuals embracing innovative designs to adorn their fingertips. Among the myriad options available, textured nail designs have emerged as a captivating trend, adding depth, dimension, and a tactile element to manicures. We delve into the captivating world of textured nail designs, specifically exploring the enchanting realms of 3D, velvet, and caviar nails. These designs elevate nail art to a whole new level, captivating the eye and captivating the touch. Whether you’re a nail art enthusiast or simply curious about the latest trends, join us on this artistic journey as we unravel the techniques, showcase inspiring examples, and offer tips for maintenance and longevity. Get ready to embark on a textured nail adventure, where creativity knows no bounds and fingertips become a canvas for three-dimensional wonders.
Exploring 3D Nail Designs
When it comes to making a bold statement with your nails, 3D nail designs are a captivating choice that adds an extra layer of creativity and dimension. Unlike traditional flat nail art, 3D nail designs incorporate various materials and embellishments to create eye-catching three-dimensional effects. These designs truly elevate your manicure to a whole new level, transforming your nails into miniature works of art.
To create your own stunning 3D nail art, follow these step-by-step instructions. Begin by preparing your nails, ensuring they are clean and trimmed to your desired length. Apply a base coat to provide a smooth surface and protect your natural nails. This helps the design adhere better and prolongs its longevity.
Next, it’s time to choose suitable 3D nail embellishments. From rhinestones and studs to beads, sequins, and even tiny charms, the options are endless. Consider the theme or style you want to achieve and select embellishments that complement your vision.
With your chosen embellishments in hand, it’s time to bring your 3D design to life. Apply a thin layer of clear nail polish or nail glue to your desired nail area. Using tweezers or a dotting tool, carefully place the 3D elements onto your nails, arranging them to create the desired effect. Whether you want a simple accent or an elaborate design, take your time to ensure each element is precisely placed.
Once you’re satisfied with your design, it’s crucial to secure the 3D elements in place. Apply a generous layer of clear top coat over your entire nail, taking care to cover the embellishments thoroughly. This not only seals the design but also adds a glossy finish and protects your creation from chipping or peeling.
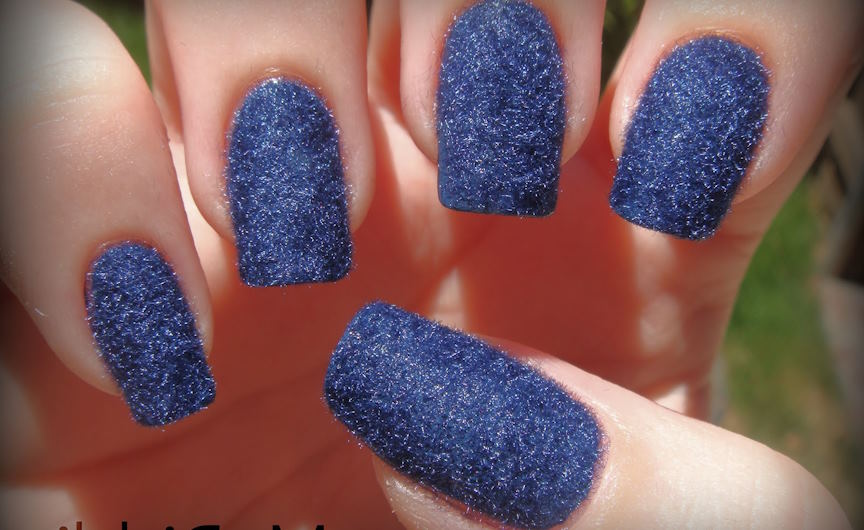
Embracing Velvet Nail Designs
For those seeking a luxurious and tactile experience with their nail art, velvet nails are the epitome of opulence. With their soft, plush texture reminiscent of velvet fabric, these designs add a touch of elegance and sophistication to any manicure. Let’s dive into the world of velvet nails and discover how to achieve this lavish look.
To achieve mesmerizing velvet nail designs, follow these step-by-step instructions. Begin by applying a base coat to your nails. This not only protects your natural nails but also provides a smooth surface for the velvet powder to adhere to. Choose a suitable nail polish color that complements the velvet powder you’ll be using.
While the nail polish is still wet, it’s time to sprinkle the velvet powder onto your nails. Ensure that the wet polish is evenly coated by gently pouring the powder over the nail surface. Take a moment to appreciate how the fine powder clings to the polish, creating a velvety appearance.
To intensify the velvet effect, gently press the powder into the wet polish using your finger or a clean brush. This step helps the powder adhere more securely and enhances the plush texture. Be careful not to press too hard to avoid smudging the polish or altering the desired effect.
Once you’ve achieved the desired velvet effect, it’s time to remove any excess powder. Gently brush off the excess powder using a soft brush or a fan brush, ensuring that the velvet texture remains intact. Pay attention to the edges and cuticles to create clean lines and a polished finish.
To seal and protect your velvet design, apply a top coat over the entire nail surface. This not only enhances the longevity of the design but also adds a glossy finish. The top coat ensures that the velvet powder stays in place, preventing any potential flaking or fading.
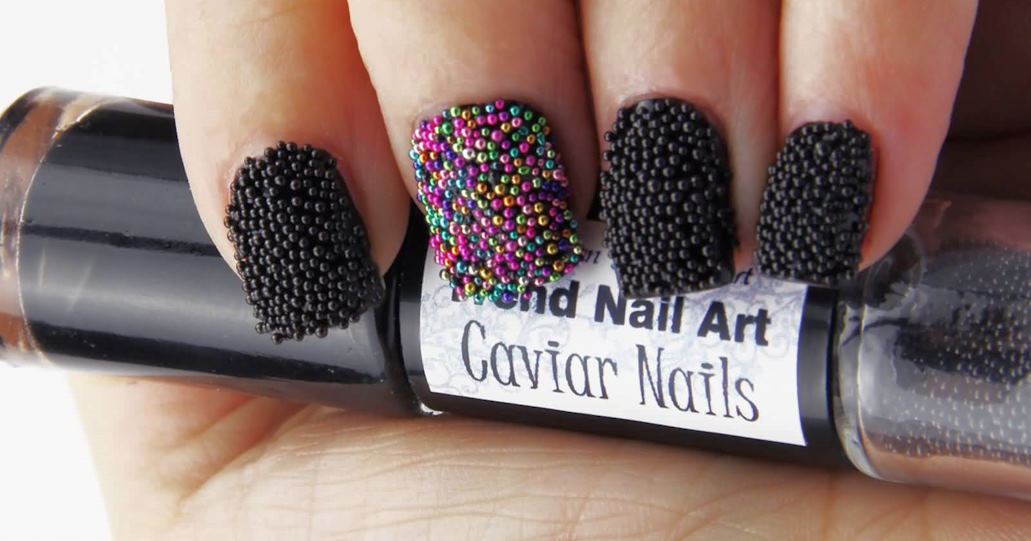
Discovering Caviar Nail Designs
If you’re looking to add a touch of luxury and texture to your manicure, caviar nails are an exquisite choice. Inspired by the tiny beads found in the culinary delicacy, caviar nails offer a unique and captivating look that is sure to turn heads. Let’s dive into the world of caviar nails and uncover the secrets to achieving this sophisticated design.
Caviar nails get their name from their resemblance to the delicate beads of caviar. These tiny spherical beads come in a variety of colors, sizes, and finishes, allowing for endless creativity and customization. The result is a stunning and tactile nail design that instantly elevates your manicure.
To achieve gorgeous caviar nail designs, follow these step-by-step instructions. Start by preparing your nails, ensuring they are clean and free of any old polish or oils. Apply a base coat to create a smooth surface and protect your natural nails. This provides a solid foundation for the caviar beads to adhere to.
Next, apply a colored nail polish of your choice and allow it to dry partially. You want the polish to be tacky but not completely wet. This allows the caviar beads to adhere to the surface effectively.
Now comes the fun part – sprinkling the caviar beads onto your nails. Gently pour the beads over the wet polish, ensuring they cover the entire nail surface. Use your finger or a clean brush to press the beads gently into the polish, allowing them to sink in and create a textured effect. Take care not to press too hard to avoid smudging the polish.