Nail art has become an incredibly popular form of self-expression, allowing individuals to showcase their creativity and personality through intricate designs and vibrant colors. While nail polish alone can create stunning looks, the addition of rhinestones and gems takes nail art to a whole new level of glamour and sparkle. These tiny embellishments have the power to transform ordinary nails into dazzling works of art.
Techniques for Applying Rhinestones and Gems
When it comes to incorporating rhinestones and gems into your nail art, the application technique plays a crucial role in achieving a flawless and professional finish. Here are some tried-and-true techniques that will help you bring your nail art to life:
Using nail glue to secure rhinestones and gems:
Nail glue is a reliable adhesive that ensures the longevity of your rhinestones and gems. Apply a small amount of glue directly onto your nail or dotting tool, and then carefully pick up the rhinestone or gem using tweezers. Gently place it onto the desired spot and press down lightly to secure it in place. Give it a few seconds to dry completely before proceeding with the next embellishment.
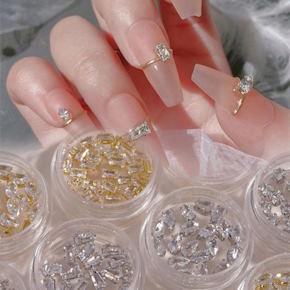
Using a dotting tool or tweezers for precise placement:
Achieving precise placement is essential for intricate designs. A dotting tool or tweezers can be your best friends in this process. Dip the dotting tool into a small amount of clear polish or glue, and use its rounded tip to pick up and position the rhinestones or gems. If you prefer using tweezers, make sure they have a pointed and non-slip grip for better control. With these tools, you can easily maneuver the embellishments and place them exactly where you want them.
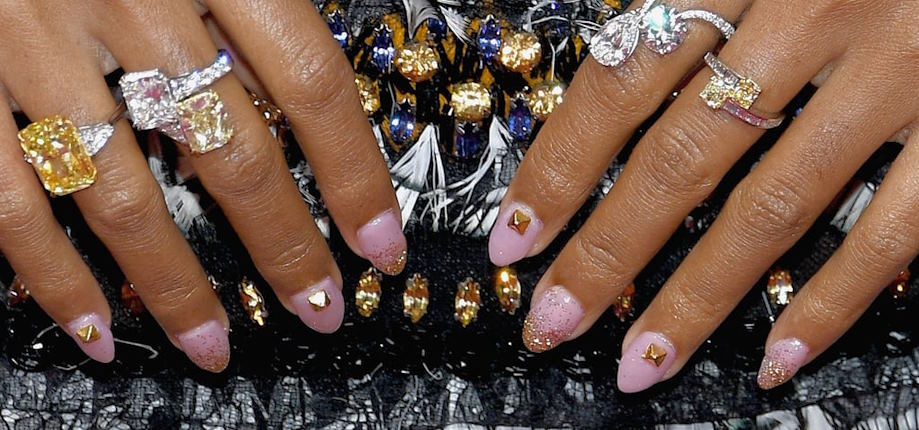
Creating patterns and designs with rhinestones and gems:
Rhinestones and gems offer endless opportunities for creativity. You can create stunning patterns and designs by arranging them strategically on your nails. Consider geometric shapes, floral motifs, or even intricate mosaic patterns. Experiment with different color combinations and sizes to achieve a visually appealing and unique look. Take your time and plan out the design before starting the application process.
Layering rhinestones and gems for added dimension and depth:
Layering rhinestones and gems adds a three-dimensional effect to your nail art, making it more eye-catching and visually interesting. Start by applying a base layer of rhinestones or gems using the techniques mentioned above. Once they are secure, add smaller embellishments on top, slightly overlapping the previous layer. This technique creates depth and dimension, giving your nail art a stunning and textured appearance.
Maintaining and Removing Rhinestone Nail Art
Once you’ve adorned your nails with stunning rhinestone nail art, it’s important to take proper care to ensure its longevity and to remove it without causing any damage. Here are some essential tips to help you maintain and remove your rhinestone nail art effectively:
Tips for preserving the longevity of your rhinestone nail art:
 Avoid excessive exposure to water: Prolonged exposure to water can weaken the adhesive holding the rhinestones in place. Whenever possible, wear protective gloves while doing household chores or activities involving water.
- Be gentle with your hands: Treat your nails with care to prevent accidental bumps or knocks that could dislodge the rhinestones. Avoid using your nails as tools and be mindful when handling objects.
- Apply a topcoat: After applying rhinestone nail art, seal it with a high-quality topcoat. This will provide an extra layer of protection and help prevent the rhinestones from lifting or losing their shine.
Proper removal techniques to avoid damaging your nails:
- Soak-off method: If your rhinestone nail art is gel-based, the soak-off method is the safest and most effective way to remove it. Soak a cotton ball in acetone, place it on your nail, and wrap it with aluminum foil. Let it sit for about 10-15 minutes to loosen the gel polish and rhinestones. Gently scrape off the softened polish using an orangewood stick or a cuticle pusher. Avoid forcefully pulling or prying off the rhinestones to prevent nail damage.
- Non-gel removal: For non-gel rhinestone nail art, soak a cotton pad in nail polish remover and press it firmly onto your nail. Let it sit for a few minutes to dissolve the polish and adhesive. Gently wipe away the polish and use an orangewood stick to lift and remove any remaining rhinestones. Be patient and take your time to avoid putting excessive pressure on your nails.
Caring for your nails after removing the rhinestone art:
- Moisturize your nails and cuticles: After removing the rhinestone nail art, moisturize your nails and cuticles with a nourishing cuticle oil or a moisturizing hand cream. This helps restore moisture and keeps your nails healthy.
- Give your nails a break: Allow your nails to breathe and recover from the embellishments. Avoid applying new nail art immediately and give your nails some time to regain their strength.